
Simchat Torah takes place on the last day of Sukkot; this year it starts on the evening of October 17. It’s celebrated by taking out the Torah scrolls and carrying them around the sanctuary in seven circles (hakafot). Dancing, singing and rejoicing are part of the festivities, as is eating Torah-shaped food.
Chef Jeff Frymer decided to create special Torah Crepes in honor of Simchat Torah.
“Crepes have always been a food of celebration in my house,” Frymer told the Journal. “I thought why not combine the joy of this special family fare with the joy and celebration of the Torah.”
“Crepes have always been a food of celebration in my house,” Frymer told the Journal. “I thought why not combine the joy of this special family fare with the joy and celebration of the Torah.”
Frymer said crepes can be sweet or savory, simple or complex. They can be anything from a sprinkle of sugar and drizzle of lemon juice on top to plump, fruit- and cheese-filled crepes more akin to blintzes.
He started learning the art and craft of crepes at the age of 9,
“I stood beside my mother as she deftly maneuvered the just-right-hot pan beneath the just-right-consistency mixture of flour, eggs, milk, water, and butter,” Frymer said. “That is the foundation to the art of it. The rest is practice.”
Crepes
2/3 cup flour
2 eggs
1/4 cup water
3/4 cup whole milk
1 Tbsp melted unsalted butter
1/8 tsp salt (a pinch)
Batter Instructions:
Put all ingredients into a bowl with high enough sides to avoid splashing, and mix, using an immersion blender. You can also use a regular blender or mixer.
Blend mixture until you reach a smooth, easily pourable consistency, akin to cream. It should be thicker than half-and-half and thinner than pancake batter.
If you have the time, let the batter rest anywhere from half-an-hour to overnight in the fridge. Honestly, they’ll be delicious if you make them immediately.
Making the Crepes:
Unless you already have a couple 10” crepe pans, use whatever 10” non-stick pan you have available. If you are just learning to make crepes, one pan will suffice, but once you get the hang of it, you’ll be able to wield two pans like a ninja.
Set pan(s) on medium heat as you get everything in place on the counter near the stove:
– Bowl of prepared batter with a small ladle
– Cup of water to thin batter as necessary
– Firm/frozen butter and knife
– Thin-bladed spatula (non-metallic preferred to avoid damaging pan)
– Plate for cooked crepes
Apply a thin coat of butter to the pan, it doesn’t need to be perfect. You can paint it with a frozen stick of butter, or you can just scrape a knife blade tranche into the pan and swirl, which is my preferred method. Take care not to burn the butter.
Once the butter is in the pan(s), work quickly. Swirl batter with a ladle to mix a bit and take a half scoop to start, holding it at the ready over the bowl.
In the other hand, take the pan off the fire and hold it next to the bowl. Bring pan to the bowl and ladle the batter into the center, while maneuvering the pan to coat the surface (yes, this will take practice). You will find that the better you get with your pan hand, the less batter you will require. Your reward will be a greater quantity of thinner crepes.
Replace the pan on the fire for about 30-40 seconds. The goal is to cook the batter just enough so it releases easily from the pan and can be flipped with a spatula; the edges will just start to brown.
Use the edge of the spatula to gently lift the crepe; slide the spatula under the center and flip. Sometimes an edge gets bent over on itself on the flip; gingerly, and taking care not to burn yourself, flip it flat with your fingertips (safety first). You may also find it easier to simply raise one side of the crepe with the spatula; then flip with your fingers from the get-go.
If you are like me, you will become emboldened to skip the spatula altogether, let the crepe cook a little longer for you to shake it loose from the pan and deftly flip it one-half rotation in the air and back into the pan. Any crumpled missed attempts aren’t a tragedy; they just wind up eaten before making it to the table.
Allow flipped crepes to cook another 20 seconds or so, and then slide or flip onto a plate. Feel free to add a little water as necessary to thin the batter, as it may thicken slightly, particularly if it’s not rested.
Repeat the process until all the batter is used. The above recipe netted me 9 ½ crepes in total, which you can use in any way you prefer. Continue on to make the Torah Crepe!
The Torah Crepe
Filling Ingredients:
5oz fresh spinach
12 thin asparagus, or 4 larger spears
4 quarter-inch slices from center of
medium zucchini
8oz cottage cheese, ricotta, or cheese
of your choice
2 pats butter
Salt and pepper to taste
Instructions:
Saute spinach in butter, salt and pepper to taste, set aside.
Blanch asparagus, salt to taste, set aside.
Core center of zucchini slice to fit 3 small or 1 larger asparagus, then brown on both sides. Salt to taste and set aside.
Putting it all together:
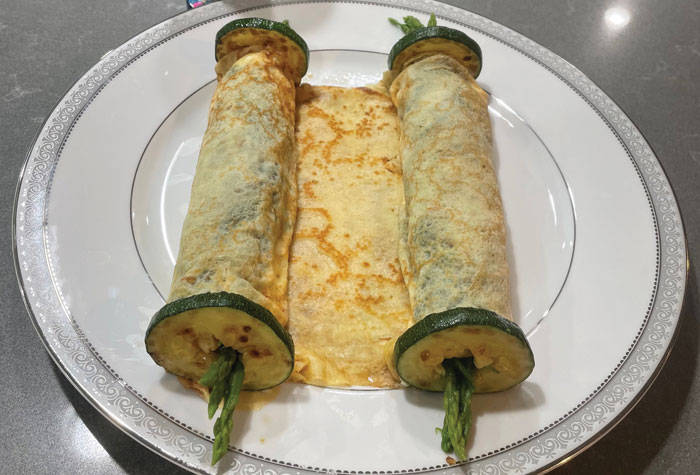
Arrange 3 crepes on a cutting board, 2 of them next to each other (edges touching) and 1 over the center of the others.
Mix spinach and cheese together. Place equal amounts of filling in a vertical line in the center row on the outer crepes. The goal is to roll the outer crepes to create the scrolls leaving a little space in the middle to look like an open Torah scroll, so channel your inner artist.
Press asparagus into the middle of the mixture, allowing the tips to poke out the tops and bottoms of the crepes. These will be the “handles.”
Now comes the tricky part. With both hands roll each side of the crepes (one at a time), trying to preserve as even a cylindrical shape as possible from the outside and stop in the middle (closed scroll). Gently transfer onto the center of a serving plate. Unroll “scroll” leaving a couple of inches in the center. Slide zucchini slices over the asparagus tips and voila: Torah Crepe!
“Simchat Torah is a celebration of the Torah scroll and eating foods that signify a resemblance is traditional.“ – Samantha Ferraro
Samantha Ferraro, author of “The Weeknight Mediterranean Kitchen” and founder of The Little Ferraro Kitchen, said there is nothing like her mother’s sweet and sour cabbage rolls.
“She always insisted on adding sour salt, which is hard to find,” Ferraro told the Journal. “The addition of fresh lemon juice and brown sugar does the trick.”
Her recipe is a simple mixture of meat, rice and herbs, which are stuffed inside hearty cabbage leaves and simmered in slightly sweet and tangy tomato sauce.
“Simchat Torah is a celebration of the Torah scroll and eating foods that signify a resemblance is traditional, making these stuffed sweet and sour cabbage rolls the perfect addition,” Ferraro said.
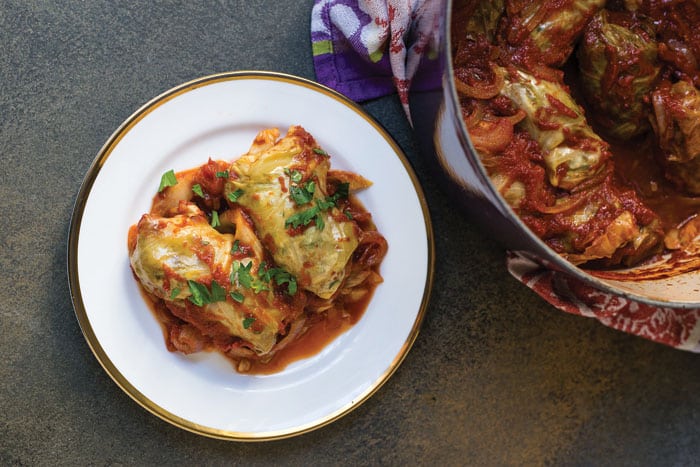
Photo courtesy of The Little Ferraro Kitchen
Sweet and Sour Cabbage Rolls
Yields 6 servings
Ingredients:
Small head of green cabbage
1 red or white onion, sliced thin
Meat mixture:
1 pound ground beef
1 small shallot, chopped finely
2 tsp garlic powder
1 tsp paprika
1 tsp Kosher salt
1/2 tsp black pepper
2 tbsp chopped parsley
1/4 cup breadcrumbs
1/2 cup basmati rice
1 egg, whisked
Sweet and Sour Tomato Sauce:
4 cups tomato sauce or pureed tomatoes
1 tbsp garlic powder
1 whole lemon zested and juiced
1/3 cup brown sugar
2 tablespoons tomato paste
1/2 tsp salt or more to taste
1/4 tsp black pepper
Instructions:
Preheat the oven 350°F.
Bring a large pot of water to a boil and carefully place the whole cabbage in. Boil until the outer leaves begin to soften, about 10 minutes. You can also place the cabbage in the freezer the day before and thaw, which makes the leaves pliable.
Place the cabbage in a colander to cool enough to handle. Cut out the core of the cabbage and gently peel away whole cabbage leaves. If some tear, that’s okay. You can either double up with another leaf or line the bottom of the pot with broken leaves later on.
In another bowl, mix the ground beef, spices, chopped parsley, breadcrumbs, rice and egg and mix well until well combined.
For the sweet and sour tomato sauce, add all those ingredients in a bowl and stir to combine. You can taste for seasoning and if you wish to make it more sweet or sour, adjust as you like..
Line an oven-safe pot with any extra or torn cabbage leaves and scatter sliced onions.
Use a small paring knife and cut the hard stem off each cabbage leaf. Take about 1-2 tablespoons of meat mixture and roll cabbage up, tucking in the sides so no meat is exposed, then continue rolling into a tight cabbage roll.
Line the cabbage rolls in the pot and pour tomato sauce over the cabbage rolls.
Cover the pot with lid and lace in the oven and bake for about 50-60 minutes, until meat is cooked through and rolls are tender.
Serve cabbage rolls with a spoonful of tomato sauce and extra lemon if you prefer.


 More news and opinions than at a Shabbat dinner, right in your inbox.